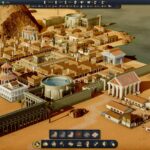
Hey! In this post I’ll explain the what and why of the decisions behind the development of the Terrain and Detail systems of One Military Camp.
Just a disclaimer: the pictures included here may not represent the final quality of the product and are used with mere illustrative purposes.
Initial research
At first we tried with the Unity Terrain, using its API for runtime modifications and our custom shaders for some extra features. It looked promising and we stuck with it for some time, but as development of One Military Camp progressed we realized we needed more.
What more? In particular we needed more resolution and speed (as always in game dev!) so we decided to go all-in with an in-house solution tailored for our use case. When you don’t need all the features found in a generic solution it’s often possible to achieve better results with a custom one.
So, our requirements? Being able to modify heights and textures of very specific areas of the terrain surface, while still being able to undo it and return to the original state. Since our users will be placing, moving and removing stuff on the terrain in real time it’s important to do all that on the fly and in a non destructive way.

Our approach
Our approach was the creation of specialized masks for later interpretation. A mask is simply a texture that contains information in one or more color channels (red, green, blue, alpha) that can then be retrieved as values in the range 0 to 1, e.g. in a shader. Our Terrain System renders two masks:
- Mask1: splats (red, green, blue) and holes (alpha).
- Mask2: heights (red) and tint (green).
Splats?
When working with multilayer materials (such as a terrain in which we combine e.g. soil, grass, gravel and stone) we use a splat map that defines what textures to use in a particular spot. Because we use 3 channels (red, green and blue) we can mix up to 4 layers (since the absence of color is also accounted for).
Holes?
Some of our buildings have features like swimming pools that go deeper below ground level. So, instead of lowering the terrain vertices (which could result in unwanted displacements in their neighbourhood) we simply discard (don’t draw) the terrain pixels under this holes mask. The value is inverse to what is common in transparency alpha, i.e. 0 means no hole, 1 means hole.
Heights?
This may look as the most obvious one, but with a caveat. Commonly in terrain systems the height information would define how high a vertex has to go (effectively defining a height map). In our case, it instead defines how deep the vertex goes, so it’s not really a height map for us and we could call it a depth map if you want. Specifically, 0 means highest, 1 means lowest.
Tint?
This one defines how to mix the colors when drawing the detail objects like grass or rocks. More on this later.
It’s no coincidence that there are two masks separated like this: Mask1 (splats and holes) is applied to pixels, while Mask2 (heights and tint) is applied to vertices. That way we can optimize and access these masks only when needed.
Ok, so we have our masks defined, but how do we generate them? Sometimes simple is best. The Terrain System has two cameras, one for each mask, and they only see mask objects. What is a mask object? Every road, building, etc. in the game has a couple quads attached. These quads could be seen as funny colors, but these colors are really defining their part of the whole mask. Now imagine we draw all these mask objects together from a cenital orthographic point of view. The result would be something like this:


You may be wondering why some of the values have been reversed from what is common in the industry. I’ll explain. The way we composite the mask colors is additive (clamped to 1). In other words: if two mask objects overlap, the resulting value is never lower than the greatest one. For example: suppose Object_A and Object_B share some space and both are defining a hole. As stated above, 0 means no hole and 1 means hole. There will be parts where Object_A wants to draw 0 and Object_B wants to draw 1. The resulting value after compositing will be 0 + 1 = 1 (which means the hole prevails). That way we can place masks without fear of unwanted overrides. I leave it as an exercise for you to deduct what will happen when other values overlap and how this applies to the height map as well.

And you would ask: “But how can you render and apply a huge mask like this to a huge terrain, keep updating it every frame, and still achieve good frame rates?” That’s why we again leverage our particular use case: the game doesn’t allow the camera to go very far back and it never shows a big portion of the terrain. Thanks to this, instead of having huge masks covering the whole terrain, we use very small ones that cover only the visible area and act like a window through which we see the complete masks. This means we can benefit from it and increase the perceived resolution of the splats, holes, etc.
Quality is in the details
But a terrain system isn’t complete until you can add some vegetation and rocks to it, right? The main challenge for this is how can we draw a massive bunch of objects, complete with wind effects and whatnot, and stay above 60fps. To achieve this we use GPU instancing. The technique the CPU almost completely while the GPU draws the same one mesh over and over at different locations. Not surprisingly, GPUs are really fast at drawing meshes, and turns out this works wonderfully for drawing vegetation and repeating objects.

So we created a Detail System that would work along the Terrain System. With it we can define (via a custom tool) as many detail object locations as needed. But it’s internally that it’s most interesting. First it takes the terrain and subdivides its area into a hierarchy of smaller regions. For every region it determines what detail object locations fall inside. Thanks to this, during gameplay, the system is able to pick only the locations whose region is visible by the camera. That’s called culling. Finally a drawcall is issued for all of the locations of every visible regions. As a result, all the detail drawing is really fast.
The next step involves our above friends, the masks. While drawing each detail object we know where it is and what values the masks have there. So we can use this information to:
- Displace the vertices based on the height value.
- Hide grass based on the splat values.
- Change the color based on the tint mix value.

Wrap up
And roughly that’s all! We hope you found this interesting and don’t forget to wishlist One Military Camp.
Thanks for reading!
You can read previous Devlog entries here
Written by David Corominas (Programmer at Abylight Barcelona)